

If you are entering the world of UI/UX or web development, Wireframes are the foundational step that helps you define the interface and user experience. These are not just simple sketches, but powerful tools for optimizing layouts, saving design time, and avoiding errors during development. In this article, we will explore the concept of Wireframes, the top tools for effective design, and a step-by-step guide to creating a professional preliminary sketch. Let's join Markdao to find out!
What is a wireframe?
Definition
A wireframe is a preliminary sketch of a website or application interface that describes the overall structure and arrangement of elements on a page. It focuses on layout and interaction flow without delving into graphic elements like colors, images, or animations.
This is considered a crucial step in the UI/UX designprocess, helping development teams and clients visualize the product structure before starting detailed design or coding.

Distinguishing between Wireframes, Mockups, and Prototypes
Although wireframes, mockups, and prototypes are all essential tools in the digital product design process, they have distinct differences:
- Wireframe: A basic sketch focusing on layout, component placement, and core functionality, typically represented by simple lines.
- Mockup: A more detailed version of Wireframe, incorporating colors, typography, and graphic elements, but without interactive functionality.
- Prototype: An interactive test version that allows users to experience real-world interactions, such as clicking buttons, navigating pages, and performing actions similar to the finished product.
In short, Wireframe is the starting point for shaping design concepts, followed by Mockup to refine the visual interface, and Prototype to simulate the product's functionality almost entirely before development.
3 common types of Wireframes
Wireframe can be categorized into three main levels based on their level of detail and represented features:
1. Low-fidelity Wireframe (Basic)
- A simple sketch, often hand-drawn or created using basic tools to quickly define the overall layout.
- It only includes shapes, lines, and simple icons to represent the placement of elements such as headers, content, and buttons.
- Suitable for the early stages of the design process, helping to communicate ideas quickly without significant time investment.

2. Mid-fidelity Wireframe (Intermediate)
- More detailed than low-fidelity, these use digital tools to clearly define page structure, layout, and the arrangement of elements.
- Design components begin to take on their actual shapes, though they lack specific colors or imagery.
- Often used for presentations to clients or development teams to align on the design before moving to the next stage.
3. High-fidelity Wireframe (Advanced)
- Closely resembling the final product, these include details on dimensions, typography, icons, and may even feature simple effects.
- They can sometimes include basic interactions to simulate the user experience.
- Used in the final stage before transitioning to complete graphic design and product development.
Each type of wireframe serves a different purpose in the design process, helping to optimize the journey from initial concept to finished product.
Why are wireframes important in website design?
Wireframes play a crucial role in the website design process by shaping the structure and functionality of a page before moving into detailed design and coding. Here are the key benefits for website development:

Optimizing user experience (UX): Wireframes help define the placement of content and interactive elements on a page, thereby optimizing the user experience. By focusing on navigation, layout, and key focal points, they ensure that users can easily find information and interact with the site effectively.
Defining website layout and structure: Wireframes helps designers and developers get an overview of the website structure, including:
- The arrangement of elements such as headers, menus, main content, and footers.
- The connections between pages and how users navigate through the website.
- The allocation of space for each element to ensure consistency and visual clarity.
Save time and costs in the design process: Using wireframes from the very beginning helps identify and resolve interface and user flow issues before investing in graphic design or programming. This helps to:
- Minimize complex revisions at later stages, avoiding wasted time and resources.
- Ensure the design and development teams are aligned, preventing errors during product implementation.
Easy adjustments before full development: Wireframes allow the design team to test multiple layout options and adjust based on feedback from clients or the development team. As a result, the product optimization process runs more smoothly without affecting the overall timeline.
Improve communication between stakeholders: Wireframes act as a bridge between designers, developers, and clients. They help to:
- Communicate ideas visually without the need for extensive explanation.
- Help clients easily visualize the product before implementation begins.
- Ensure all stakeholders share a common vision throughout the website development process.
Create a solid foundation for UI design and programming: Wireframes not only help build a good layout but also help developers clearly understand the functionality of each part of the website. With a complete draft, the UI design team can easily apply colors, images, and effects without altering the original structure.
Investing in a Wireframe quality will help the website achieve higher effectiveness and avoid errors during the development process.
Top 5 best wireframe design tools today
Choosing the right wireframe design tool can help optimize the website design process, increase productivity, and improve user experience. Below are the 5 most popular tools currently trusted by UI/UX designers and developers.
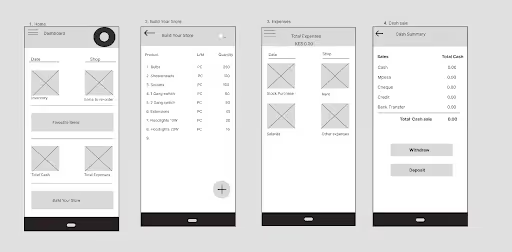
1. Figma
Pros:
- A web-based design tool that supports real-time collaboration.
- Provides many wireframe templates to help create sketches quickly.
- Supports drag-and-drop, is easy to use, and is suitable for both beginners and experts.
- Integrates powerful features like auto-layout and components to optimize the design workflow.
Cons:
- Requires an Internet connection to use (the offline version is still quite limited).
- The free version has limited storage capacity.
Best for: UI/UX design teams, startups, and businesses looking for effective collaboration.
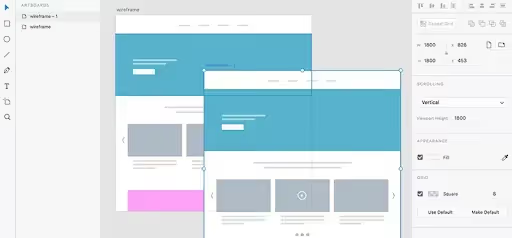
2. Adobe XD
Pros:
- User-friendly interface with seamless integration with other Adobe software like Photoshop and Illustrator.
- Supports creating wireframes ranging from basic to complex, which can be easily converted into prototypes.
- Provides various tools for creating precise layouts compatible with multiple platforms.
- Allows for direct interactive design without the need for additional software.
Cons:
- Requires a high-performance computer to run smoothly.
- Lacks the robust real-time collaboration features found in Figma.
Best for: Professional designers and users already within the Adobe ecosystem.
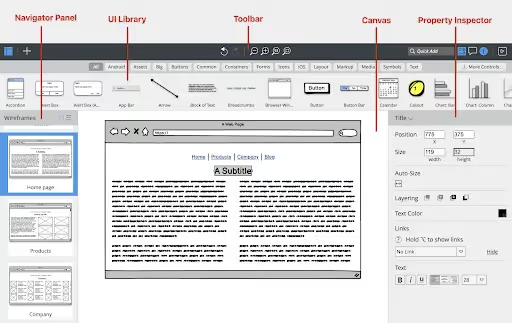
3. Balsamiq Wireframes
Pros:
- Simple, easy-to-use interface that requires no advanced design skills.
- Create wireframes quickly using a rich library of drag-and-drop components.
- Supports exporting files in various formats like PNG and PDF for sharing with clients or development teams.
- Available in both online and desktop versions.
Cons:
- Does not support high-fidelity interface design like Figma or Adobe XD.
- Lacks advanced features for interactive design.
Best for: Beginners and businesses looking to create wireframes quickly without investing heavily in complex tools.
4. Sketch
Pros:
- Intuitive interface, easy to use, and optimized for UI/UX design.
- Supports a Symbols system that allows for flexible reuse of design components.
- Offers a wide range of plugins to extend functionality and integrate with other tools.
- Runs smoothly on macOS, making it ideal for designers using Mac.
Cons:
- Only available on macOS; no version for Windows.
- Lacks real-time collaboration features like Figma.
Best for: Professional UI/UX designers and Mac users looking for powerful, optimized tools.
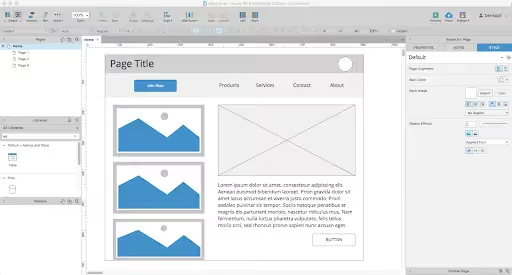
5. Axure RP
Pros:
- A powerful tool for designing wireframes and complex prototypes.
- Allows for the creation of interactive models without the need for coding.
- Supports the creation of detailed documentation for the product development process.
- Suitable for large-scale projects that require complex functionality.
Cons:
- The interface is quite complex and has a steep learning curve.
- Higher price point compared to other tools.
Best for: Enterprises and large projects requiring detailed wireframes and robust interactivity.
Each tool has its own strengths and weaknesses, depending on the user's needs and level of expertise. If you need a flexible tool that is great for teamwork, then Figma is a great choice. If you prefer the Adobe ecosystem, Adobe XD is a powerful tool. Balsamiq is suitable for beginners, while Sketch is a specialized tool for Mac users. If you need an in-depth solution with robust prototyping capabilities, Axure RP is worth considering.
Guide to Effective Wireframe Setup
Step 1: Define goals and conduct user research
Before you start designing a wireframe, you need to clearly understand who the product is for and what its primary goals are. Identify user needs, analyze design trends, and research similar products to find the best ways to optimize the experience.
Step 2: Brainstorm ideas and build the overall structure
Once you have enough information, sketch out a rough outline of how to organize the content and navigation flow of the website or application. This is a crucial step to ensure users can easily interact with the product. Use hand-drawn sketches or simple tools to brainstorm ideas before starting detailed design work.
Step 3: Choose the right design tool
Selecting the right tool will help you implement your wireframe more quickly and effectively. Software like Figma, Balsamiq, Axure, or Adobe XD all offer great features for sketching layouts, arranging elements, and adjusting interfaces with ease.
Step 4: Establish a logical layout and information hierarchy
Use a grid system to organize your layout scientifically, ensuring a balanced distribution of interface elements. At the same time, establish a visual hierarchy by differentiating the size, color, and spacing of elements. This helps users easily consume content and navigate the website effectively.
Step 5: Finalize the wireframe and move to UI design
Once the wireframe has been thoroughly reviewed and refined, you can begin adding visual details like colors, images, and typography to transform your concept into a complete design. Ensure your draft is clear enough for the development team to implement without any obstacles.
It not only helps optimize the design but also saves time, minimizes errors, and ensures the final product meets user expectations.
Conclusion
Wireframing plays a crucial role in the website design process, helping to define structure and optimize user experience from the very beginning. Understanding the different types of drafts, using the right tools, and following a design process will help you create an intuitive, effective product. Invest in wireframes from the start to save time, optimize costs, and ensure project success.